Wednesday, 22 January 2025

Bookmaking Kit step by step guidelines

 Hello, and welcome to this instruction post for my book kits. 

I have included plenty of pictures and step by step instructions and I trust that you will enjoy the creative process. (No kit? No problem, look on my website:  neelzexpressionz.com )

The instructions are divided into two sections. Firstly is the covers, and section 2 is the inner pages. As all my kits are supplied totally un-decorated, I will point out places and recommendations for decorating which you may find helpful though obviously, how you decorate is determined by your personal style. 

Shall we begin?

The covers:

1. Place fabric for spine onto a non stick mat and coat with PVA glue (be generous) 

2. place spine centrally onto glued surface and press firmly in place.


3. Add the two covers to either side leaving approximately 5mm gap between the spine and the covers (both sides

4. Fold fabric over both the top and bottom and press in place (add a little more glue if needed.) Then place a weight on top and leave to dry.

5. When dry you have your basic cover, ready for the next part; adding the decorative overlay or/and elements.

It can be easier to glue the front cover and lay the overlay down. Lay a weight over and leave to dry.

Elements can be glued and laid down individually.

6. Once your cover is dry and secure, you can decorate and embellish away. Now is a good time to paint the inside edges of your cover too. ( Before painting I tend to use a good quality gesso to prime the cover and edges.)

7. Now you are ready to prepare the spine for binding. (if you have a paper guide then cut it out. If you don't then you will need to cut a piece of paper the size of the spine and mark as seen on the photo) 

8. Then, lay the cover onto a thick piece of foam, a mouse mat or cutting mat to protect your worksurface. Use an awl to make holes through the spine using the dots as a guide, taking care not to move the template.

9. Once all the holes have been made; lift the cover off the mat and, using the awl, push through to widen the hole to make it easier when it is time to thread the pages.


Once your covers have been painted and decorated, add end papers. Cut two pieces of decorated card/paper slightly smaller than the covers and glue down


Time for the inside of your book.

The amount of pages for your book will be determined by the type and thickness of the paper you use. so you might have to play a little to get the right amount for you. For this example I am using 200gsm smooth white card (A4 size for an A5 signature)

1. Working on a clean surface (with clean hands!) take five sheets of card, fold in half and use a bone folder to neaten the fold.

2. Use a craft blade and metal ruler on a cutting mat to neaten. Line up with the top page and trim down. Repeat for all signatures.

3. If you haven't a guide, cut a piece of card to the size of the signature and use the markings from the spine guide to mark the paper punch holes. Lay as shown. If you do not have a stitching cradle then hold as shown on a foam mat and cutting mat to protect your surface.

4. Punch holes with an awl. Repeat for the other signatures, keeping everything lined up.

Putting everything together.

1.Divide your binding cord into equal pieces and thread one onto a large eye needle. Starting from the outside back corner, push the needle and thread through the cover and pull through, leaving a "tail" of thread.


2. Pick up a signature and push needle and thread through the top hole as per photo below.


Go out of the signature bottom.


Go out of the base of the cover.


Hold both ends and adjust to equal length.


Knot off at the top keeping the tension tight. Don't trim the ends after knotting yet.


Repeat for the other signatures. Now you can get creative with the ends. Tie beads etc, weave the excess threads to create a decorative finish, trim ends and glue the knots.
There will be examples of my books here on the blog to give you an idea of what I do.

Hope you enjoy.
Take care
Neil

Tuesday, 16 August 2022

The stranger returns......


Hello everyone, if there's anyone still out there listening.

It's been a crazy challenging time these last few years hasn't it ? I am now trying to tie all my little threads of "social media" together at the moment. So you'll get a random selction of photos to accompany my waffling.......

                                              "My first foray into the world of Book Nooks"


So, firstly I have my website up and live at neelzexpressionz.com and from the home page there are the links to my blog and Etsy store. I also have a newsletter sign up option on the website if you want to keep up to date. ( seeing as I have only sent out about three newsletters I can assure you I won't be spamming you!)

                                                    I make the occasional set of stamps....


So, here is a brief update summary of what's going on in my life and business. Susan and I are still happily ensconsed here in Eden, the house is still not finished, the lockdown obviously had an impact for us but we survived. I was on Hochanda for a while but had to make a decision, do I want to focus on making kits etc or do I want to actually make more books myself?  So I left Hochanda and my focus is definitely on making and selling my finished books while still designing and selling some kits, stamps and stencils along the way.

We have a regular spot in Keswick most weeks and also do a couple of local markets alongside stocking some local shops and galleries. So, while there's still lots we want to do, we are blessed with what we have got going so far.


Workshops are my next focus, I had a recent one which was successful so I am looking forward to building on that.


So that's what's what at the moment. I'd love it if you popped over to the website for a look, and also if you join in the newsletter too that would be super cool.

God bless

Neil

Wednesday, 10 February 2021

New stamps and shapes.

 Good afternoon folks.

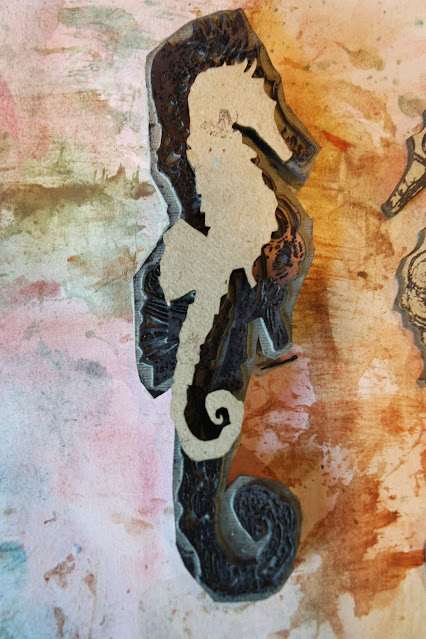
Thought I would pop on quickly to share a bit about one of the new things I have been doing. I recently have made some sea themed stamps and popped them onto my Etsy store.  As they come with some matching shapes I thought I would pop a little post on here just to show how I have designed them to work.


First up is the seahorse which I can tell, is going to be the favourite lol. You get the rubber stamp and 9 of the design cut in greyboard. (3 each of large, medium and small)

As you can see, the large shape corrosponds with the stamp. Personally, I think it is easier to take the shape to the stamp for this.

Ink up the stamp, press the shape and there you have it, one dimensional sea horse....

Now when it comes to the other shapes, to get them to look like "proper" sea horses the trick is to line the shape up so the eye is in the right place like this for the medium. (Note that if the tail has blank bits then it's easy enough to stamp it onto one of the other areas to pick up the pattern)

and the small.
There they are, all stamped... I think they are cool

All coloured up and then a coat of clear heat embossing over.

You can stamp with versamark and heat emboss fine black like this before colouring.
And, bacause I have cut them out of rubber, you can stamp into heat embossing to create this kind of effect (this is two layers of bronze extra thick powder heated and stamped into while still hot, then gilding was added to bring out the texture)
The same principle applies to the fish..... so I won't go into detail again word wise, but here are the pics for the large.


Medium

and small


Obviously the jellyfish have no eyes so it is easy enough to stamp but one thing worth saying is that don't try to line up the strands, because they are thin you will find that by the time you  have gessoed or painted the base before stamping, they will have moved. so I just line up the top and let the legs do what they like....


I think they are fun, and who doesn't like under the sea themes.
If you are interested, the links for them are below.

You can find the seahorse HERE
You can find the fish HERE
You can find the jellyfish HERE


Wednesday, 18 November 2020

It's all behind the scenes at the moment

 Good evening folks.

I have been having to chain myself to the production lines at the moment which is always a difficult thing in one sense. When your days are filled to the brim with the business and preparation side of things it can get a tad frenetic.

So in amongst the busyness I took the opportunity to cut up one of my designs to experiment.....


It was fun and it actually didn't turn out too bad in the end though.


I also have finally managed to make proper progress on my new range of "engravability" journals. I have been working on the designs for a while now and I will be showcasing them properly for the first time on Saturday... 


Where ? I hear you ask..... here I reply lol because 

So, if you want to see them and a bunch of other new work do take a look on Saturday when it all goes live and perhaps you will find that perfect Christmas gift too. 

And finally, next week I'll be back on screen on Thursday 26th 2pm on Honchanda..... New kits and stencils too. Along with (hopefully) some fun demos......
Until then, I had better get back to listing, describing and "setting up my stall" for Saturday
Take care everyone