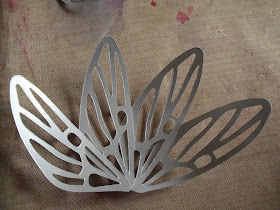
Firstly you need to take your sheet of A4 card (I used silver card, white on the back) and cut into 5cm strips
out of these you will cut 9 large wings and 8 small. (Remember to always place the cardstock the same way up when you cut when using doublesided)
This shows how I cut my wings from each piece
Once you have cut your 9 large wings curl with your fingers if you wish and begin to attach as shown using a small amount of glue on the ends only and continue round until you reach the first one again.
Repeat the process with the small wings (I used the white side of the card)
Using the tattered floral die cut two large and two medium daisies out of tissue paper
Stamp a flower design onto a sheet of tissue (I used dusty concord and weathered wood DI)
and begin to cover a box with it by using glue, or in this case, I used gesso because I wanted to lighten the box!
When dry assemble everything as shown large flower, the two large tissue flowers, small wing flower, two small tissue flowers and an antique button and attach to the beribboned box as shown!
Quick update with some variations for you
Variation one:
To make this one I used the large wings x 6 glued them onto a medium daisy from the tattered florals die and folded them over (securing with glue dots). I mounted a paper rose to the centre and the whole flower was mounted onto the large daisy tattered floral.
Variation two:
To make this one I made a large flower and a small flower as per the original instructions. I then folded the large wings over and secured with glue dots to hold. I then cut them at the fold line and scrunched the centre ones, curled the white small petals at a side angle and used a large brad in the centre.
Hope you like them too and are inspired.


Thanks for the tutorial!I don't have this die and now I'm thinking of it!The silver card looks like metal!Amazing job!
ReplyDeleteOMG!!! I love it, Just bought these 2 dies so i can't wait to have a go! Thanks for the step by step.
ReplyDeleteWhat an amazing flower, simple (after reading your instructions) & dramatic at the same time. Thanks for the tute Neil, looks like I need to go shopping this very moment.
ReplyDeleteAnother inspiring project Neil:)
ReplyDeleteJill
you are awesome. Thanks for sharing.
ReplyDeletecheers,
Malyn
Outstanding...I can't wait to give this a try.
ReplyDeleteGreat idea! Thanks for sharing!
ReplyDeleteFabulous! I love seeing new ways to use the supplies I already own. Thanks so much for sharing.
ReplyDeleteHow fun. I don't have this die, but my sister does. I may have to borrow it.
ReplyDeleteThese are awesome! Well done for seeing the wings would make great petals - They are beautiful, delicate flowers.
ReplyDeleteVery cool!!!! I bet they'd be awesome made from grungepaper!!!
ReplyDeleteLovin your flowers, Who would have thought to use the butterfly to make flowers, Fabulous!!!!
ReplyDeleteSorry to hear about your wifes fall. Give her my best!
Hugs Lynn
OMG, these are fantastic! I have been browsing your blog and love it. Not only am I going to follow, I am adding it to my bloglist so I never miss anything.
ReplyDeleteWhat an ingenious idea - fabulous flowers. Thanks for your creative spark, for seeing what CAN be.
ReplyDeleteVicki - A little inkling
Neil, such a neat idea..:)))love it!
ReplyDeleteWe feel and want the spring come ! :-) And so want flowers !! Your wings flower is very interessant idea, thank you to show us this :-)
ReplyDeleteTime..just gone each day. Love this project. Thanks for the step by step. Your creations are always UNIQUE.
ReplyDeleteThanks for sharing the winged flower tutorial!! I ordered the butterly die because I saw your idea. Off to give it a try.
ReplyDeletebeautiful Neil - thank for sharing .... I am now a follower!
ReplyDeleteSandra
Beautiful. Thank you so much for the tutorial.
ReplyDeletewowzers
ReplyDeleteOMG these are stunning and beautiful
ReplyDeleteBeautiful. Thank you so much for the tutorial.
ReplyDelete