Good evening friends.
I have to say; I love the Christmas season. I always have and I am sure I always will. Some years I leave everything to the last minute but this year is going to to be an early start. I'm in the mood to begin LOL.
Today I thought I'd share some of my new tree decorations.
They may not be the best of photos because of the light but I'm sure you'll get the idea. And, I even remembered to do the step by step pics too.
I picked up these bauble shapes from a show recently so they are the starting point. These are plywood but any chipboard shapes will work just as well.
For my images I used elements from the latest Making Cards magazine as I loved the traditional look to them. (They also had two of each so I could have the same design on both sides.) Just a note here; remember that every step detailed here is done on BOTH sides of the shape!
I chose my images and drew around them using the bauble as the template and glued down with DecoArt Faux finishing Medium.
Once they were dry I used a sanding grip to trim and neaten the edges.
For the next step I used black Archival ink and foam to add colour and shadow to them. I used this rather than Distress Ink because I needed it to dry waterproof.
You can see the difference it makes in this next picture.
By the end I had 6 baubles prepared
Now of course, it isn't Christmas without a bit of glitter is it? So out came the Stickles and I added some sparkle ....
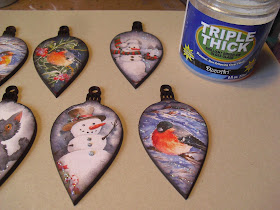
Then it was time to add some shine with DecoArt Triple Thick Brushable Glaze.
One side of each bauble was covered with a liberal coating and left to dry overnight. I love this stuff, it is self leveling so it gives a gorgeous even layer of glaze.
It is important that the glitter and glaze is done on one side only and left to dry thoroughly before doing the other side. Even though it may feel touch dry in a few hours I recommend allowing at least 24 hours in a warm place.
Once they had been glazed on both sides I finished them off with a hanging twine and an organza ribbon bow.
Aren't they pretty? Older daughter has already laid claim to the kitty and younger daughter will choose one for herself. The rest will adorn one of our Christmas trees.
I still have four baubles left which I want to decorate differently so I will be back with more.
Hope you all have a lovely evening....


You never, ever disappoint me! Lovely!!
ReplyDeleteAbsolutely lovely Neil Happy Christmas x
ReplyDeleteAm loving these Neil and think I just may have to get this glaze
ReplyDeleteP xx
Hi Neil , what a great idea, must try the idea as I have the same mag
ReplyDeleteJan x
What a smashing idea would make a great christmas project for the kids to do as well, thanks for sharing x
ReplyDeleteFantastic will have to try these.
ReplyDeleteJulie
These are lovely
ReplyDeleteTHESE are so fun and festive!
ReplyDeleteI have this glaze product...NOW I'll have to use it!
Thanks for the inspiration = )
Absolutely stunning Neil. I love your work.
ReplyDeleteThe thick glaze looks great - sorry to be a nuisance but is it as thick as several layers of UTTE? Thanks :)
ReplyDeleteThat cat is cute. Must get me some of that glaze. Hugz
ReplyDelete